Easy Tissue Paper Flowers for Kindergarten Kids
Brighten up your kindergarten classroom with delightful and easy-to-make tissue paper flowers! These eye-catching decorations not only transform the room into a inviting oasis but also provide an interactive, hands-on crafting activity for the little ones. Let's dive into the magic of creating tissue paper flowers that will make every day a bloom-ber of joy.
Tissue paper flowers are a wonderful blend of art and play, enabling young children to explore their creativity while honing their fine motor skills. But fret not, parents and teachers, these flowers are as simple as they are stunning. With just a few basic materials and a bit of patience, you'll be rewarded with gorgeous blooms that will light up any space.
What You'll Need to Create Easy Tissue Paper Flowers
The best part about these tissue paper flowers is their simplicity. You'll need just a handful of easily accessible materials to create your masterpieces.


Gather up:
- Tissue paper (multiple colors for a vibrant display)
- Scissors (safety scissors for kids)
- Cardstock or construction paper (for the flower stem and leaves)
- Glue or a glue stick
Preparing the Tissue Paper Petals
First, let's get our tissue paper ready for blooming. Choose a color or blend a few shades to create layered hues in your flowers.


Here's how to prepare the tissue paper petals:
- Stack six to eight sheets of tissue paper.
- Fold the stack accordion-style, making each fold about an inch wide.
- Once folded, stack the tissue paper piles on top of each other.
- Now, carefully cut around the folded edge of the tissue paper stack to create a petal shape.
Assembling the Tissue Paper Flower
Now that we have our petals ready, it's time to bring our flowers to life!
Follow these simple steps to assemble your tissue paper flower:


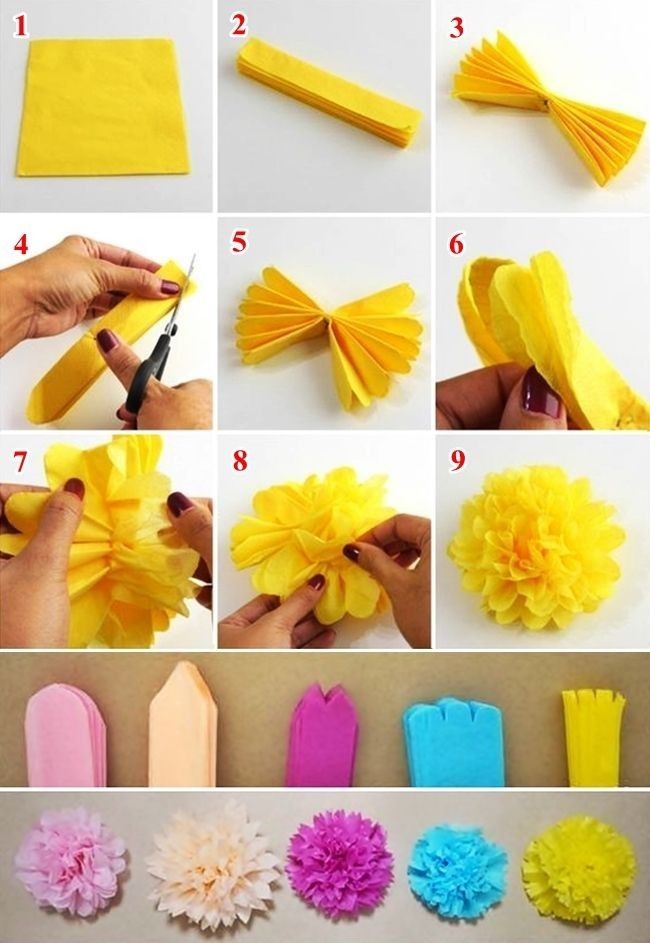


- Take the stacked petals and twist the center tightly to create the flower's bud.
- Starting with the bottom layer, carefully unfold one petal. Move to the next layer and unfold another petal, staggering them to create fullness.
- Continue working your way up, unfolding petals as you go.
- Once all petals are unfolded, pinch the center together to create a fluffy tissue paper flower.
Creating the Flower Stem and Leaves
With our flowers in full bloom, it's time to give them a place to stand tall and proud.
Let's craft some vibrant stems and leaves to complete our masterpieces:
cardstock Stem
Using green cardstock or construction paper, cut out a long rectangle (about 2 inches wide). Fold it in half lengthwise, then bend the top to form the stem's natural curve. Glue this to the back of your flower.

Leaves
From the same cardstock, cut out several leaf shapes – mix and match sizes for a varied, natural look. Glue them to the stem below the flower.
Place your new tissue paper flowers in vases, string them up as garlands, or display them around the classroom to create a delightful, handmade garden. Encourage your little ones to create their own color combinations and unique designs, fostering their creativity and growth. Watching their smiles bloom as they admire their handiwork is the sweetest reward of all.
Related Articles

Easy Tissue Paper Flowers Tutorial
Crafting your own tissue paper flowers is not only a cost-effective way to decorate and liven up your space, but it's also a fun, creative activity that you...
Easy Tissue Paper Flowers for Toddlers
Adding a touch of color and joy to your little one's playtime can be as simple as transforming ordinary tissue paper into whimsical flowers. Crafting tissue...

Tissue Paper Balloon DIY: Easy & Creative Tutorial
The art of DIY crafts has always been about creativity, cost-effectiveness, and the satisfaction of creating something unique. Tissue paper balloons are a...

Paper Plate Animal Crafts for Kids: Fun & Easy DIY Ideas
Unleash your child's creativity and imagination with one of the most versatile and eco-friendly craft materials - paper plates! These inexpensive and easily...

DIY Tissue Paper Bowl Craft: Easy & Eco-friendly
Have you ever considered turning tissue paper into beautiful, functional bowls? It may sound unconventional, but tissue paper crafts have surged in popularity...

Paper Plate Mazes: Fun, Engaging Activity for Kids
Are you looking for a fun, engaging, and eco-friendly activity for kids or adults alike? Look no further than paper plate mazes! This versatile craft is not...