Paper Plate Skeleton DIY Craft Tutorial
Paper plate skeletons, a classic Halloween craft, have been delighting children and adults alike for decades. These simple yet engaging craft projects transform ordinary paper plates into whimsical characters, perfect for decorating homes, chloral plays, or wearing as costumes. If you're looking for a fun and easy way to celebrate the spooky season, look no further than the humble paper plate skeleton.
One of the main appeals of paper plate skeletons is their accessibility. These crafts require no sewing, painting, or advanced artistic skills. With just a few simple supplies, anyone can create a skeleton that's both eerily realistic and delightfully charming. Whether you're crafting with kids or looking to add a festive touch to your home, paper plate skeletons are an excellent choice.
Materials Needed
Before you start creating your paper plate skeleton, you'll need to gather a few supplies. The most crucial material is, of course, the paper plates themselves. You can use standard white paper plates, but colored or patterned plates can add a fun twist to your skeleton. Other necessary materials include:


- Black construction paper or cardstock
- Scissors
- Glue or a glue stick
- Optional: Googly eyes, pompoms, or other decorative materials
Choosing the Right Plates
When selecting your paper plates, consider the size of the skeleton you want to create. Larger plates will yield larger skeletons, great for hanging on walls or wearing as costumes. Smaller plates are perfect for creating miniature skeletons or attaching to gift boxes.
Another factor to consider is the number of plates you'll need. To create a full-body skeleton, you'll need at least three plates (one for the head and two for the body). If you want to create arms and legs, you'll need additional plates for each limb.


Design Options
While the basic paper plate skeleton maintains a classic, iconic look, there are plenty of design options to make your creation unique. You can add additional bones with construction paper to create wings, jaws, or extra bones. You can also add accessories like top hats, bows, or sunglasses to give your skeleton a playful touch.
For a more interactive skeleton, consider adding moveable joints. By cutting slits in the sides of the plates and inserting construction paper or pipe cleaner bones, you can create arms and legs that move. This is an excellent option for creating skeletons that can dance, wave, or even "walk" across the table.
Creating the Skeleton
Once you have your materials ready, it's time to start creating your paper plate skeleton. The first step is to cut out the bones from black construction paper. You'll need two large bone shapes for the body, two smaller bone shapes for the arms (if desired), and two even smaller bone shapes for the legs (if desired).

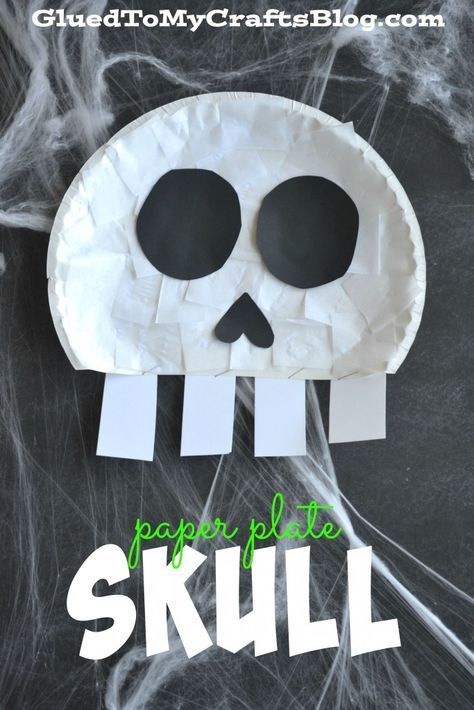


Next, cut a small hole in the bottom of each bone shape. This hole will be used to insert the glue stick and attach the bones to the paper plate. Once you have all your bones cut out, it's time to start assembling your skeleton.
Attaching the Bones
To attach the bones to the paper plate, insert the glue stick through the hole in the bone and apply glue to the inside of the plate. This method ensures that the glue is hidden and gives your skeleton a neater appearance. Start with the large bone shapes, attaching them to the underside of two paper plates to create the body of your skeleton.
If you're creating a full-body skeleton, you can attach additional plates and bones to create arms and legs. For each limb, cut a small slit in the side of the paper plate, insert the bone, and attach it with glue. Once all the bones are attached, your skeleton is ready to come to life!

Adding the Final Touches
With your skeleton's basic structure complete, it's time to add the finishing touches. Cut out two small ovals from black construction paper for the eye sockets. Glue these to the front of the head plate, along with any additional features you'd like to add, such as a nose, mouth, or accessories.
For a more realistic look, you can paint the inside of the eye sockets with white or gray paint, and add black or white pompoms for pupils. If you prefer a more playful skeleton, consider adding googly eyes or drawing a simple smile with a marker.
Displaying and Using Your Paper Plate Skeleton
Now that you've created your paper plate skeleton, it's time to show it off! There are countless ways to display and use your skeleton, limited only by your imagination. Here are a few ideas to get you started:
Home Decor
Paper plate skeletons make excellent home decor for the Halloween season. Hang them from the ceiling, attach them to walls, or place them on shelves and mantles. You can also create a paper plate skeleton family, with each skeleton member displaying a different facial expression or accessory.
For a more interactive display, create a paper plate skeleton photo booth. Attach the skeletons to a backdrop or a large hija, and provide props like hats, glasses, and signs for visitors to pose with.
Costumes and Props
Paper plate skeletons can also make fantastic costumes or props for Halloween parties, plays, or parades. Create a full-body skeleton costume by attaching additional plates and bones to create arms, legs, and even a tail. Add a staff or wand to create a skeletal sorcerer, or attach the skeleton to a large, inflatable beach ball to make a life-sized jack-o'-lantern.
For a more subtle costume, create a paper plate skeleton mask. Cut out eye holes in a paper plate, attach bones for the jaw and cheeks, and decorate with googly eyes or other embellishments. Wear the mask with a black outfit to create a stylish and spooky look.
Gift Ideas
Paper plate skeletons also make great gifts for kids and adults alike. Wrap a small skeleton around a present, or attach it to a gift bag as a festive touch. You can also create a paper plate skeleton photobook, filled with pictures of your family, friends, or favorite characters dressed as skeletons.
For a DIY gift idea, create a paper plate skeleton Advent calendar. Attach smallpaper plates to a cardboard backing, and hide small treats or trinkets behind each skeleton. Each day in December, your recipient can open a new skeleton to reveal a surprise inside.
As you can see, paper plate skeletons are not only fun and easy to make but also incredibly versatile. Whether you're looking to add a festive touch to your home, create a unique costume, or find a creative gift idea, paper plate skeletons are an excellent choice. So get out your scissors, glue, and paper plates, and let your imagination run wild! After all, the possibilities with paper plate skeletons are as endless as the night itself.
Related Articles

Craft Your Love: Paper Plate Handprint Art
Paper plate handprints are a timeless art and craft activity that spans generations. This simple yet engaging project allows individuals of all ages to create...

One Piece: Monkey D. Luffy Paper Craft Tutorial
Embark on an exciting crafting adventure with the One Piece fascinating world through a Monkey D. Luffy Paper Craft ! This boat-building, gum-gum...

Mastering Paper Plate Drawing: A Fun and Easy Art Tutorial
Transforming a simple paper plate into a vibrant canvas is an art form that's both accessible and enjoyable. This hands-on, budget-friendly activity is perfect...

Paper Plate Cow Craft - Printable Template
Transform your kids' crafts into an enjoyable and educational experience with our free printable Paper Plate Cow Craft . This delightful project combines...

Master Paper Lei Craft Template: DIY Tutorial
In the vibrant world of Hawaiian culture, one tradition stands out, both for its beauty and its significance: the paper lei. These elegant floral garlands...
Printable Paper Plate Cow Craft Template for Kids
Unleash creativity and fun with your little ones using our printable paper plate cow craft template! This simple yet engaging activity is perfect for enhancing...