Parchment Paper Envelopes DIY: Easy & Eco-Friendly
Have you ever wanted to create your own greetings cards, gift tags, or even unique pieces of art, but found it intimidating to work with blank paper? Parchment paper envelopes might just be the solution you're looking for. Not only do they provide a beautiful, textured surface to work on, but they also give your final product a professional, polished look. Here, we'll guide you through a simple, DIY process to create stunning parchment paper envelopes that you can use or gift, all while enhancing your crafting skills.
Parchment paper envelopes are versatile and can transform a simple note into a special keepsake. They're perfect for weddings, baby showers, or any special occasion where you want to add a touch of elegance to your packaging. Plus, they're easy to make and require minimal materials, making them an affordable and practical crafting project. Let's dive right in and explore the world of parchment paper envelopes.
What You'll Need: Gathering Your Materials
The best part about this DIY project is that you probably already have most of the materials needed. Here's a simple list to get you started:


1. Parchment paper or baking parchment - This is your canvas. You can find it in various weights, so choose one that suits your project.
2. Scissors - Sharp scissors will make cutting clean edges a breeze.


3. Ruler or a straight edge - Essential for drawing straight lines.
4. Pencil - A regular writing pencil will do. Just remember to use the lightest touch for drawing guidelines.
5. Bone folder or spoon - These help you score and fold your parchment, giving it that professional finish.




Choosing the Right Parchment Paper
Parchment paper comes in different weights, typically ranging from 80gsm to 160gsm. The weight refers to the thickness and durability of the paper. For envelopes, a medium-weight paper, around 120gsm, is usually the best choice. It's durable enough to withstand folding and has a lovely, textured feel.
You might also come across parchment paper with a biodegradable or release coating. These are fine to use, but they might not give you that classic, rustic look that typical parchment paper provides.
Preparing Your Workspace
Before you start, make sure your workspace is clean and well-lit. Lay out your materials within easy reach to avoid any unnecessary frustrations.

If you're planning on using a bone folder or spoon to score your parchment, you might want to place a towel or cloth under it to protect your work surface. Parchment paper can be quite sharp when scored.
Creating Your Envelope Design
Now that you've gathered your materials and prepared your workspace, it's time to design your envelope. The great thing about parchment paper is that it allows you to be as creative as you want. You can keep it simple with a classic folder-over envelope, or get adventurous with intricate designs and unique shapes.
Here, we'll guide you through creating a simple, elegant envelope that's perfect for any occasion.
Drawing the Envelope Pattern
To create your envelope, you'll first need to draw out a pattern. For a classic folder-over envelope, you'll need three pieces of parchment: one for the flap, one for the sides, and one for the bottom. The size of these pieces will depend on the size of your envelope. A good starting point is to draw your pieces at around 4" x 8" for a medium-sized envelope.
Using a ruler and pencil, draw the outline of your pieces. Remember to add a small overlap at the top edge of the sides piece and the bottom piece. This will become the glue tab that holds your envelope together.
Scoring and Folding
Once you've drawn your pattern, it's time to score and fold your parchment. Scoring creates a thin line that makes folding the parchment much easier. A bone folder or the back of a spoon works well for this.
Using your pattern as a guide, gently score the fold lines on your parchment. Be careful not to press too hard, as you don't want to tear the parchment. Once scored, carefully fold along the lines, using your bone folder or spoon to crease the edges.
Glue and Assemble
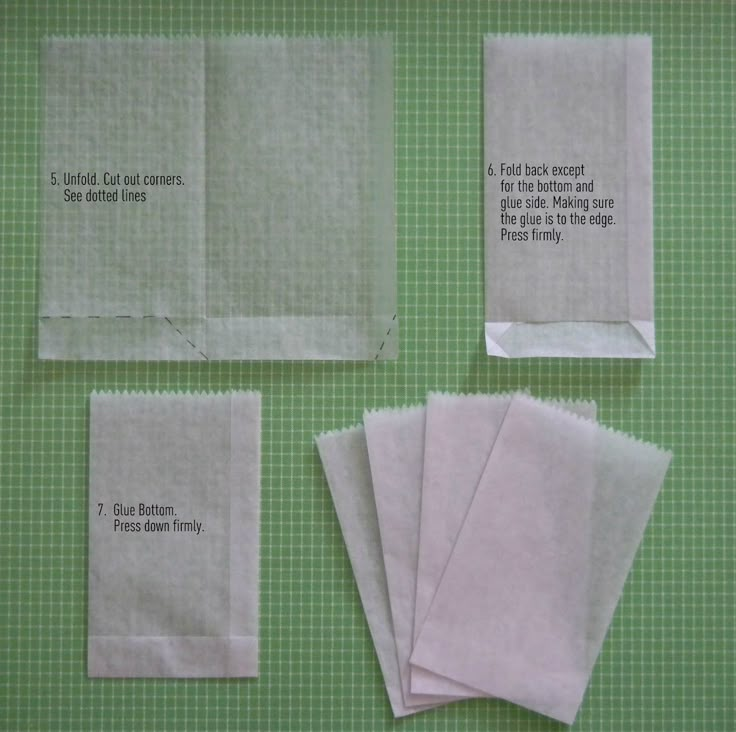
With your pieces scored and folded, it's time to assemble your envelope. Apply a thin layer of glue or a glue stick along the overlap on the sides piece and the bottom piece. Make sure to leave a small border around the edges to avoid any glue seeping onto the front of your envelope.
Fold the sides piece and the bottom piece along their scored lines, bringing them together to form the body of your envelope. Press firmly along the glue tab to ensure a strong bond. Allow the glue to dry completely before using your envelope to ensure it's sturdy and secure.
And there you have it! Your very own parchment paper envelope, ready to be used or gifted. The beauty of this DIY project is that you can customize it to suit any occasion or theme. You could stain it with tea for an aged look, distress it for a rustic feel, or even paint or stamp onto it for a truly unique design.
So, go ahead and experiment with different sizes, shapes, and designs. The possibilities are endless, and with each envelope you create, you'll hone your crafting skills and add a personal touch to your special occasions.
Related Articles

DIY Parchment Paper Liners: Easy, Eco-friendly, and Frugal
Have you ever struggled with baked goods sticking to your pan during the cooking or cooling process? Say goodbye to frustrated attempts at prizing your...

Paper Tulips on Amazon: Discover Easy, Eco-Friendly Beauty
Have you ever found yourself craving the delicate beauty of tulips but struggled with the upkeep of fresh flowers? Meet paper tulips, a charming and practical...

Paper Seed Envelopes: Eco-Friendly Seed Storage
In the heart of sustainable agriculture lies an intriguing practice: the use of paper seed envelopes. These biodegradable packets are not merely containers...

"DIY Paper Straw Tulips Craft: Easy & Eco-Friendly Project"
Are you looking for a eco-friendly and creative craft idea to brighten up your space? Look no further than the captivating paper straw tulips! This craft not...
Micro Envelopes: Small Parchment Paper Perfect for Gifting
In the realm of artisanal stationery and calligraphy, small parchment paper envelopes have emerged as a charming and functional addition that combines the...

DIY Paper Plate Clock: Easy & Eco-Friendly Kid's Craft
In the realm of DIY projects, those that involve upcycling everyday items are often the most rewarding. A captivating example of this is the paper plate clock...